

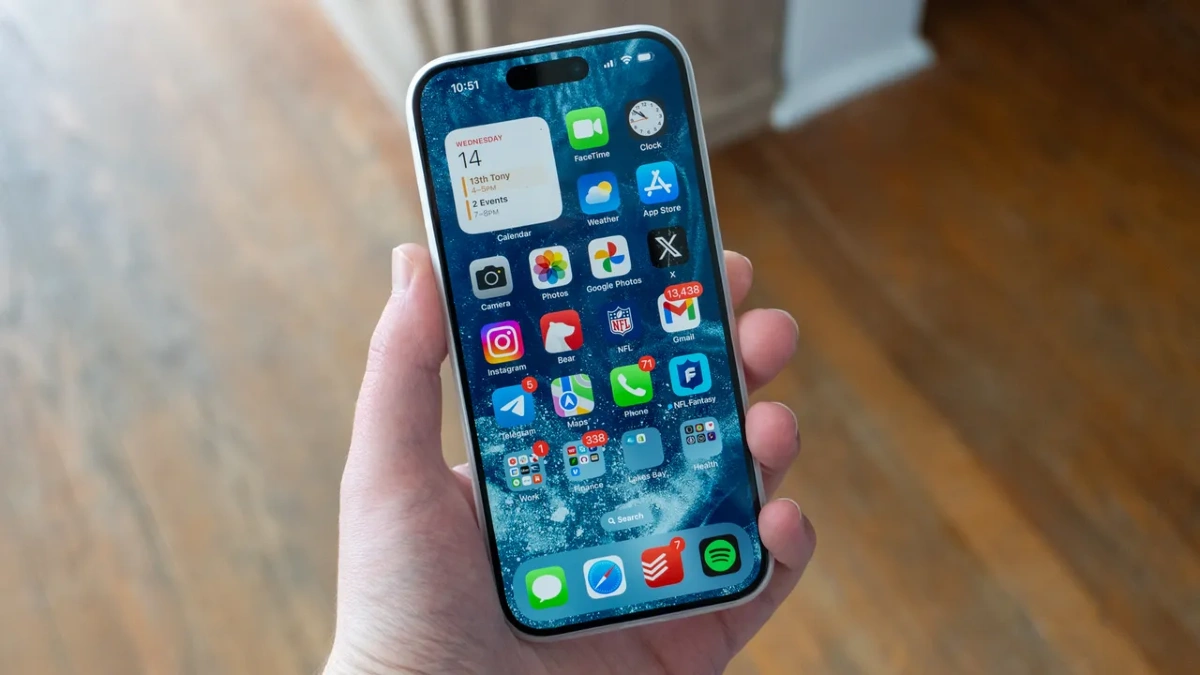
iPhone says Storage Almost Full again, but you just deleted 50 photos last week. Can’t download apps. Can’t take photos. Can’t update iOS. You’ve already deleted what seems obvious, but your iPhone is still full. The real storage hogs hide where you never look.
Message attachments pile up gigabytes of photos and videos you didn’t know were saved. App cache from Instagram, TikTok, and Spotify can easily hit 3-7 GB from a single app. Safari keeps every website you’ve ever visited.System Data balloons to tens of gigabytes with junk files Apple won’t let you see. Most people have no idea these files exist.
They’re buried in settings you’ve never opened. Clear storage in nine specific places that are probably eating 10-50 GB of your iPhone storage right now. No guessing. No tech skills needed. Just simple steps that free up space in minutes.
1. Safari Browser Cache Clear This First for Quick Storage Wins
Visit websites every day. Each one leaves invisible files behind. Safari keeps all of it cookies, images, browsing history, and website data. This browser cache piles up fast. Heavy users easily hit 1 to 2 GB without knowing it.
These files were supposed to make websites load faster. But after months of browsing, they just eat your storage. Your iPhone slows down. Safari gets sluggish. And you can’t figure out why.
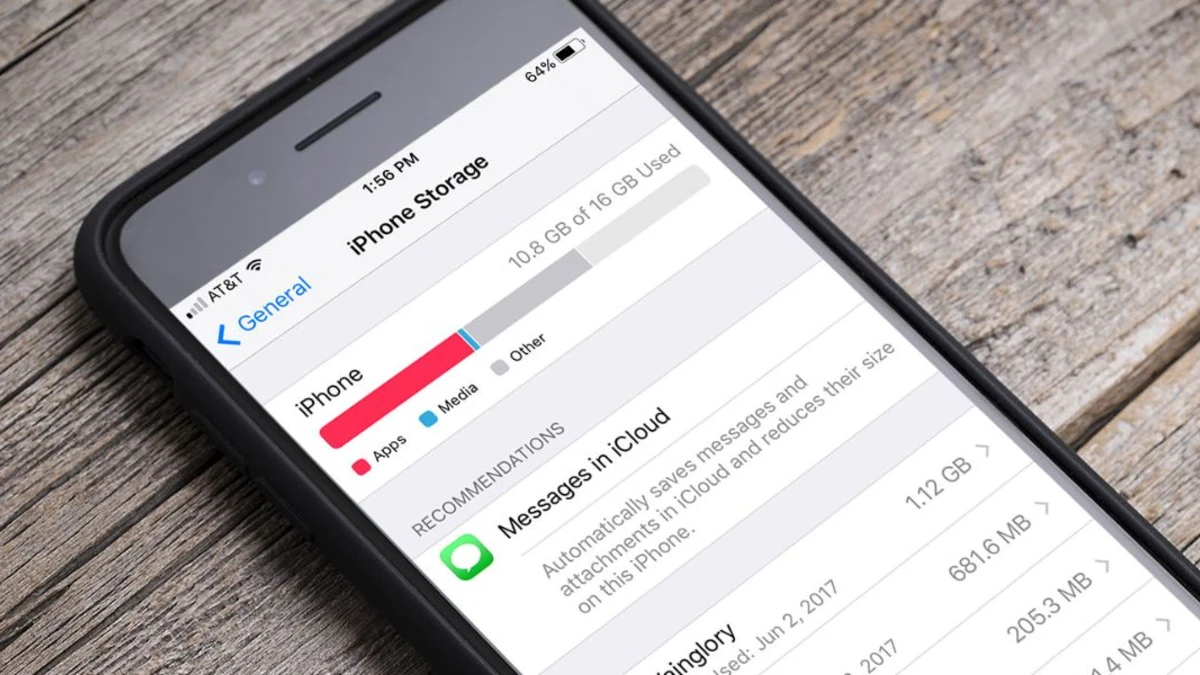
How to Check Safari’s Storage Use ?
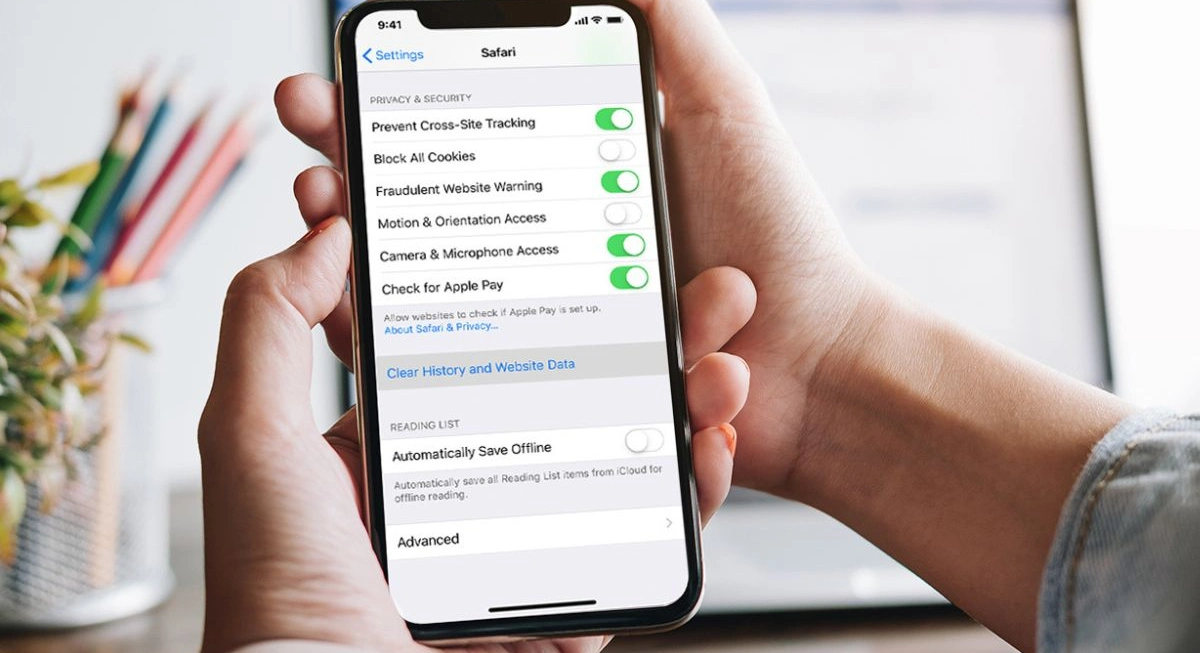
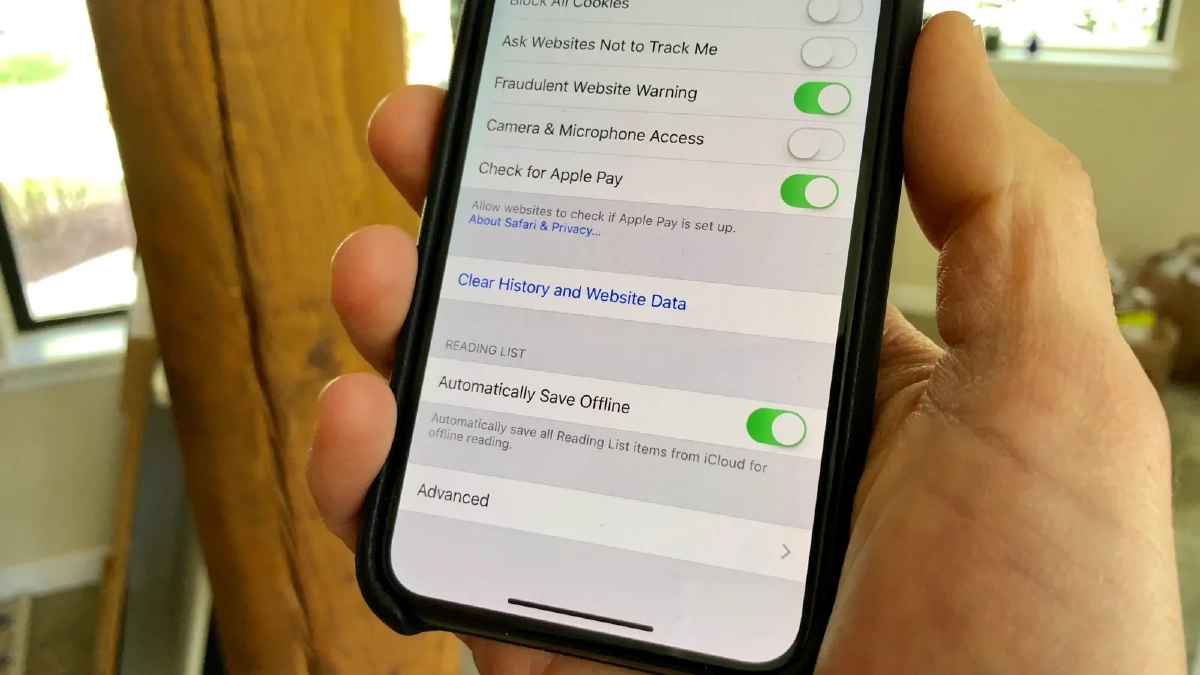
Open Settings,Tap General,Tap iPhone Storage,Scroll down to Safari. If it’s over 500 MB, you need to clear it out. Clear Safari Cache Without Losing Passwords. Delete all that website data and keep your saved passwords. Your login info stays safe. Here’s the trick.Go to Settings,Scroll down and tap Safari,Tap Clear History and Website Data,Hit Clear History and Data to confirm.
One Small Catch
Clearing Safari data logs you out of websites. You’ll need to sign back in to your accounts. Annoying. But it takes a few minutes and you get back hundreds of megabytes, sometimes over a gigabyte.
How Often Should You Do This?
Clear Safari cache once a month if you browse a lot. Once every three months if you’re a light user. Set a phone reminder. Make it a habit. Your iPhone will thank you. This is the easiest storage fix on this list. Takes 30 seconds. Do it right now before you forget.
2. Message Attachments Delete This Hidden Storage Monster
Every photo your friend texts you stays on your iPhone. Same with videos, voice memos, GIFs, stickers, and documents. Your Messages app saves all of it. Most people have no idea. One user found 1.25 GB in their Messages app.
Another cleared 30 GB of photos they didn’t even know were there. These message attachments and text message photos sit in the background, eating your storage while you delete other stuff trying to free up space.
Find Your Biggest Message Attachments
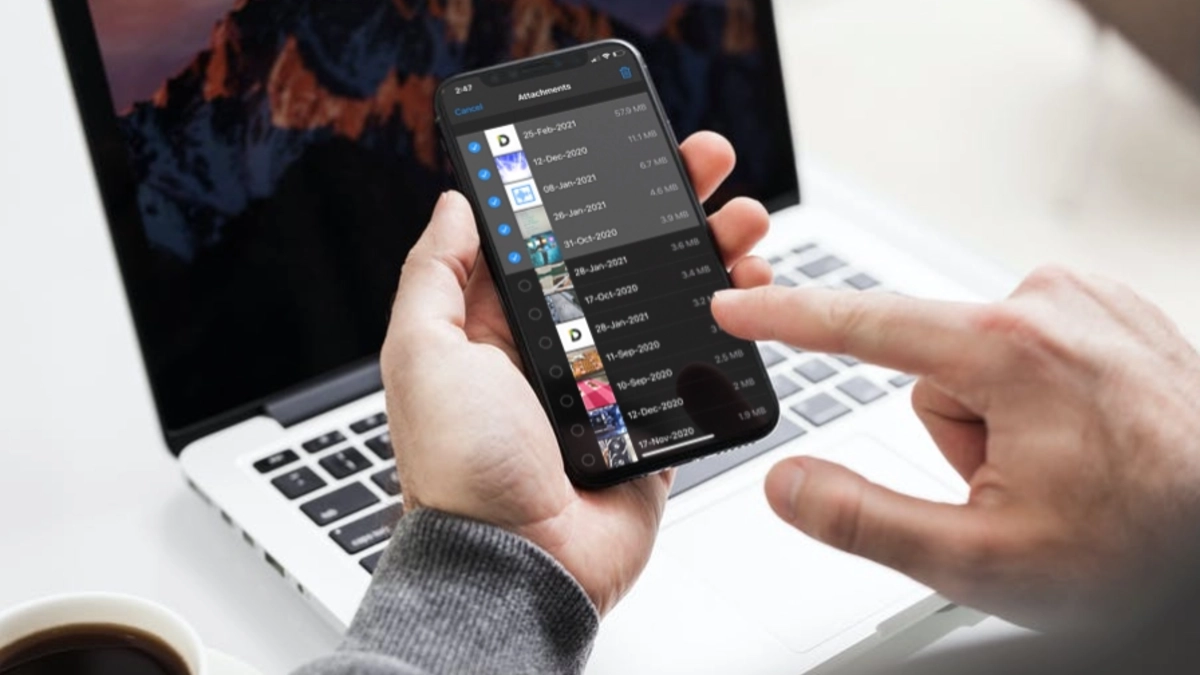
Apple built a tool to show you exactly what’s eating your iMessage storage. Open Settings, Tap General, Tap iPhone Storage, Scroll down and tap Messages, Tap Review Large Attachments. File sorted from largest to smallest. Videos usually top the list. Then photos and voice memos. Tap Edit in the top right corner. Select the files you don’t need.
Delete Attachments from Specific Conversations
Open the Messages app, Open the conversation, tap the contact’s name at the top, Tap Info, scroll down to see all attachments, Tap and hold any photo or video, Tap More. Select multiple files and hit the trash icon. The space-hogging files go away.
Set Messages to Auto Delete
Go to Settings, Tap Messages, Scroll to Message History, Tap Keep Messages, Choose 30 Days or 1 Year. Your iPhone will ask if you want to delete older messages now. Say yes. Messages older than your chosen timeframe disappear, attachments and all. Set it to 30 days if you’re tight on storage. One year if you want more history. Either way, you’ll never manually clean message attachments again.
3. App Cache Files: The Hidden Storage Killer You Can’t See
They call it “Documents & Data” or just lump it into the app size. But it’s really just junk taking up space. Spotify can hit 3-7 GB of cache. YouTube does the same. Discord stores old messages and images you forgot about. These social media and streaming apps are the biggest culprits because you use them every day. Each scroll, each video, each song leaves hidden storage waste behind.
Find Your Biggest Storage Hogs
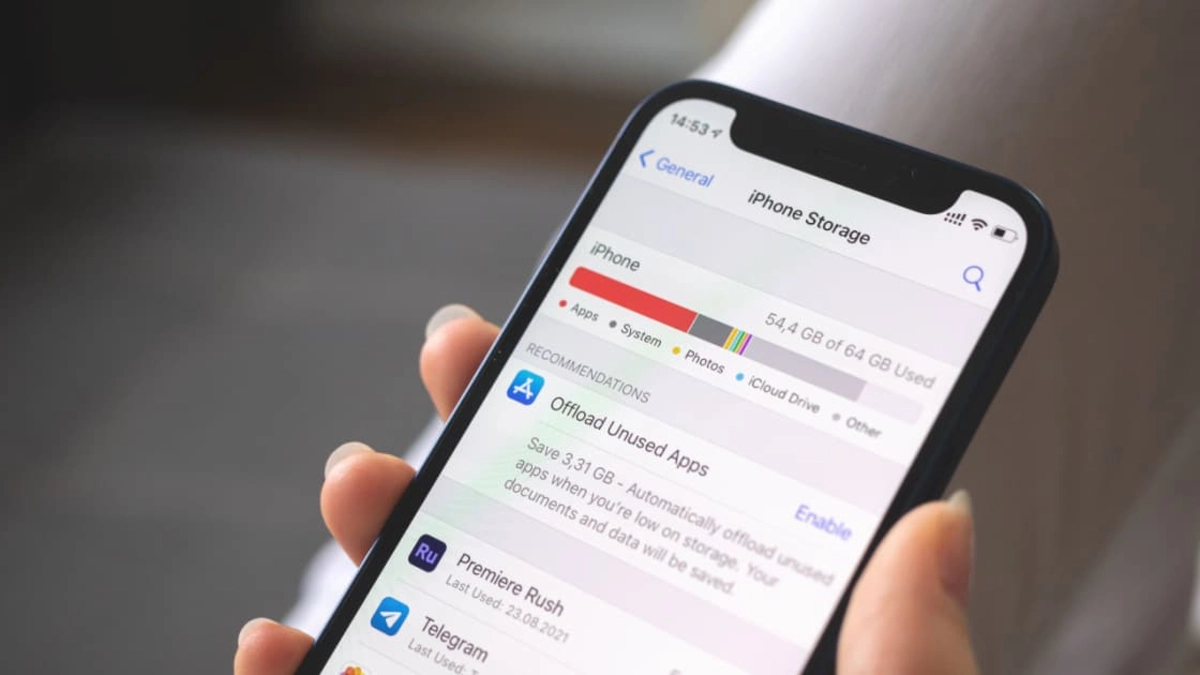
Open Settings, Tap General, Tap iPhone Storage, and wait for the list to load. Your apps appear sorted by size. Tap any app to see how much space it uses. You’ll see the app size and Documents & Data. That second number is mostly cache. If it’s bigger than the app itself, you’ve got a problem.
Clear Cache by Offloading Apps
Most apps don’t have a Clear Cache button. Apple doesn’t force developers to add one. So you need a workaround. This removes the app but keeps your login info and settings. When you reinstall it, the cache is gone.
Go to Settings > General > iPhone Storage, tap the app with too much cache, Tap Offload App, and confirm by tapping Offload App again. The app icon stays on your home screen but looks slightly faded. Tap it to reinstall. Your account logs back in automatically.
Nuclear Option
Tap Delete App instead of Offload, Go to the App Store, Download the app again, Log back in. You lose app settings and saved data. But you get back gigabytes instantly. Check your top five apps right now. Offload the worst offenders.
4. Downloaded Files Empty This Folder You Forgot About
That PDF you downloaded last month. Taking up space. The image you saved from a website. Also still there. Every downloaded file from Safari and other apps sits on your iPhone until you manually delete it.PDFs pile up. Images multiply. Documents you opened once and never needed again stay forever.
These downloaded files hide in your Files app, quietly eating storage while you wonder why your phone is full. Even when you delete a file, it’s not really gone. Apple moves it to the Recently Deleted folder. It sits there for 30 days before your iPhone truly removes it. Until then, those “deleted” files still count against your storage.
Clean Out Your Downloaded Files
Open the Files app, tap Browse at the bottom, Tap Downloads under Locations, Scroll through the list. You’ll probably find files you forgot existed. Tap Select in the top right. Choose files you don’t need. Hit the trash icon. Empty Recently Deleted for Real.
Stay in the Files app, Tap Browse at the bottom, Scroll down to Recently Deleted, Tap Select in the top right, Tap Delete All, Confirm by tapping Delete All again. Downloads and Recently Deleted both get cleaned out. You’d be surprised how much space old PDFs and images take up over time.
Stop Downloads From Filling Your iPhone
Open Settings, Scroll down and tap Safari, Tap Downloads, Select iCloud Drive, download a file, it goes to iCloud, not your iPhone storage. You can still access it through the Files app. But it doesn’t eat your phone’s space.
You need iCloud storage space for this to work. The free 5 GB fills up fast if you download a lot. But if you already pay for extra iCloud storage, this trick saves your iPhone space automatically.
5. Photos and Videos Let iCloud Do the Heavy Lifting
Your phone stores every photo at full quality. You don’t need that. High-resolution photos and videos eat massive amounts of space, especially if you take a lot of pictures. Live Photos and special effects make it even worse because they save extra data for those animations and filters.
Rarely look at old photos on your phone. But they sit there at full size, taking up gigabytes. A big photo library can easily use 10-20 GB or more of your iPhone storage.
How Optimize Storage Works
When you enable this feature, your iPhone keeps smaller versions of your photos on the device. The full resolution originals go to iCloud Photos. You can still see and use every photo. They look exactly the same on your screen. But they take up way less space.
Full quality version, your iPhone downloads it from iCloud automatically. You won’t even notice. This can save you several gigabytes, depending on how many photos you have.
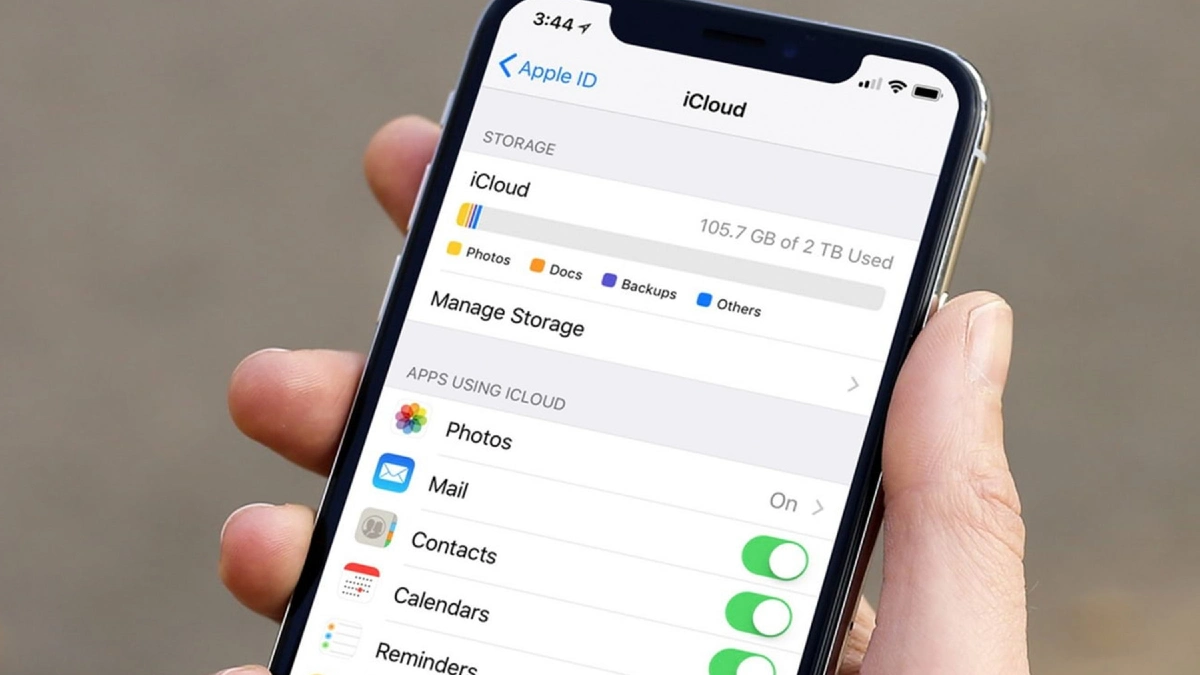
Turn On Photo Optimization
Open Settings, Tap your name at the top, Tap iCloud, Tap Photos, make sure iCloud Photos is turned on, and select Optimize iPhone Storage. Your iPhone starts moving full-size photos to iCloud right away. The process happens in the background. Check your storage in a few hours, and you’ll see the difference.
6. Unused Apps Make Your iPhone Delete Them Automatically
You downloaded that airline app once. Six months ago. It’s still there, taking up 150 MB. That game you played for two days last year. Also still there. The fitness app you swore you’d use.These unused apps add up fast. Airlines’ apps, old games, and random utilities you tried once.
Each one sits on your iPhone doing nothing. But they still count against your storage. iOS updates can need 5 GB or more of free space. If your phone is full of apps you never use, you can’t update. You can’t download new apps. You’re stuck.
Turn On Automatic Offloading
This setting tells your iPhone to automatically offload apps you rarely use. The app gets removed, but your documents and settings stay safe. The icon remains on your home screen. When you tap it, the app reinstalls instantly with all your data intact.
Open Settings, Tap App Store, Find Offload Unused Apps, Toggle it on. Your iPhone now watches which apps you actually use. If you haven’t opened an app in weeks or months, it gets offloaded automatically. You get the storage back without losing anything important.
7. System Data Fix Apple’s Mystery Storage Hog
System Data is Apple’s mystery folder. It’s probably huge on your phone. You can’t see what’s inside it. You can’t delete individual files. And Apple won’t tell you exactly what it is. System Data includes cached files, logs, Siri voices, temporary files, and other storage that iOS needs to run. Normally, it takes 5-20 GB. That’s fine. But sometimes it spirals out of control.
System Data grows over time as you use your phone. Apps create temporary files. iOS saves logs. Safari caches things. None of it gets cleaned up automatically. After months or years, this junk piles up and eats your storage.
Check Your System Data
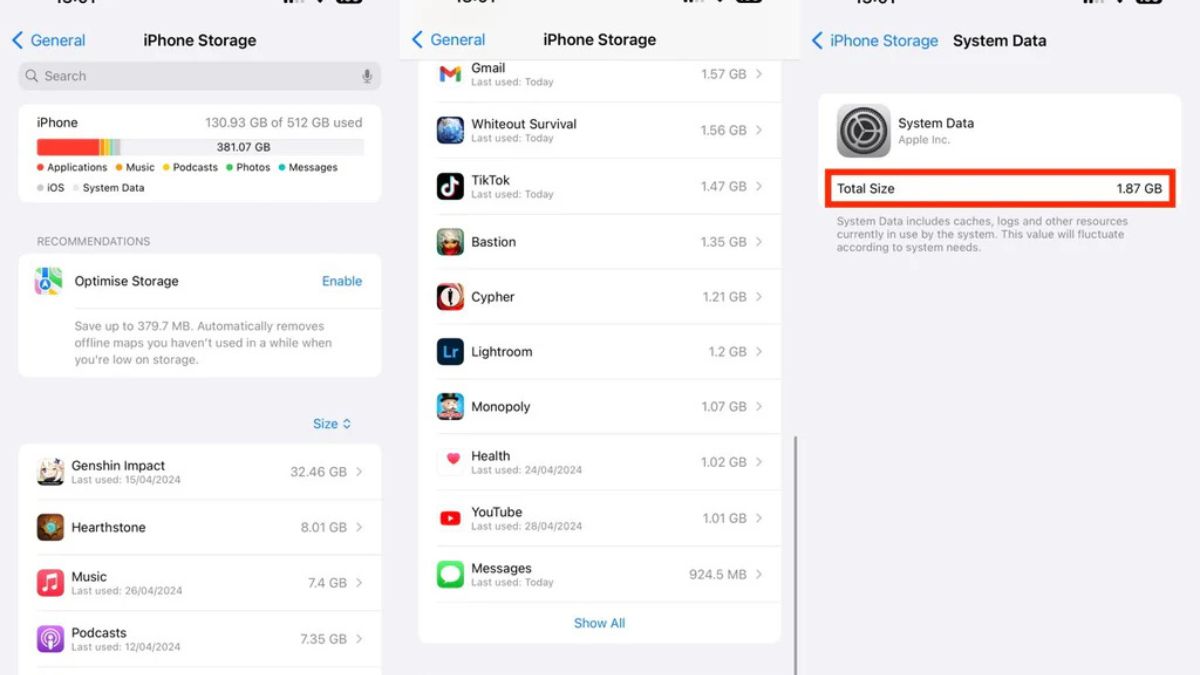
Open Settings, Tap General, Tap iPhone Storage, Look for System Data in the colored bar at the top. If it’s under 10 GB, you’re fine. Between 10 to 20 GB is normal but could be better. Anything over 20 GB means you need to clean it out. Try a Simple Restart First.
Hold the Volume Up button and Power button together. Slide to power off, Wait 30 seconds, Turn your iPhone back on. If it dropped a few gigabytes, great. If it’s still bloated, you need the nuclear option.
Date Reset Trick
This sounds weird, but it works. Go to Settings, Tap General, Tap Date & Time, Turn off Set Automatically, Tap the date and set it 3 years forward, Restart your iPhone hold Volume Up + Power, slide to power of, Turn your phone back on, Go back to Settings > General > Date & Time, Turn Set Automatically back on.
Your iPhone sees the future date and thinks cached files are ancient. It dumps them. When you reset the date to automatic, your phone syncs to the correct time and keeps the storage clean.
This trick doesn’t always work. But when it does, you get back gigabytes instantly. Check your System Data after. You’ll probably see a big drop.
8. Old iOS Updates
Your iPhone downloads updates. Sometimes they just sit there, unused. Apple’s software update system grabs new iOS versions in the background, stores them on your phone, and waits for you to install them. These update files can eat 6 to 10 GB of your storage. Maybe you saw the update notification and ignored it. Maybe the installation failed halfway through.
Maybe you just don’t want to update yet. The file stays on your iPhone anyway, taking up massive space. These downloaded updates hide in your System Data. You can’t see them in a normal file browser. But they’re there, wasting gigabytes while you’re deleting photos trying to free up space.
Check for Downloaded Updates

Open Settings, Tap General, Tap iPhone Storage, Scroll through the app list. Look for iOS Update or iOS version number. Delete the Downloaded Update. Tap the iOS Update entry, Tap Delete Update. Confirm by tapping Delete Update again. You just freed up several gigabytes.
Your iPhone doesn’t delete the update automatically, even if you’ve been ignoring it for months. You have to do it manually. Don’t worry about needing the update later. When you’re ready to install iOS, your iPhone will download it again. Nothing is lost.
9. Streaming App Data

Netflix and Spotify hide downloaded episodes you forgot about. That playlist you saved for a flight last year. Still on your phone. The TV show you downloaded for a road trip. Streaming apps like Spotify, Netflix, Apple Music, and YouTube let you download content for offline use. Downloaded songs, podcasts, videos, and shows pile up fast. Each one stays on your iPhone until you manually delete it.
But here’s what most people don’t know. Even when you’re streaming and not downloading, these apps keep significant cache. Preview thumbnails, album art, video clips, and temporary files all count as app storage. You stream a show once, and pieces of it stay behind.
Check Your Streaming Apps
Go to Settings, Tap General, Tap iPhone Storage, Scroll through your apps. Look for Spotify, Netflix, YouTube, Apple Music, Apple Podcasts, or any streaming app you use. Tap each one to see how much space it’s using. If the number is over 2 GB, you’ve got downloaded content or cache sitting there.
Clear Spotify Downloads and Cache
Open Spotify, Tap your profile icon in the top right, Tap Settings and Privacy, Scroll down to Storage, Tap Delete cache to clear temporary files. Tap Delete downloaded content to remove offline songs and podcasts. Free up several gigabytes instantly. Your playlists and likes stay saved. You just remove the actual audio files from your phone.
