
Most people just point their phones and hope for the best. You see a beautiful moment and pull out your device. Your screen looks great when you frame the shot. But then something frustrating happens. The lighting suddenly changes right before you take the picture. The camera tries to guess what you want.
You end up with a photo that looks dark or washed out. It makes capturing daily memories feel like a chore. You do not have to accept bad photos. You will learn how to lock your focus and lighting permanently. This simple trick stops the camera from making its own choices.
It puts you back in full control. You get the best shot every single time without guessing. This is the most useful hidden iPhone camera setting. Searching for good iPhone photography tips in 2026 can feel overwhelming. But this one small adjustment changes everything about how you document your life.
#1. Why Does the Lighting Keep Changing

Your phone camera constantly tries to guess what you want to see. It scans the room and adjusts the brightness automatically. But this automatic guessing often ruins the shot. The lighting shifts the second someone moves across the room. This constant adjusting destroys photos shot near bright windows or in dark corners.
Learning how to take professional iPhone photos starts with stopping this automatic shifting. You want to photograph a plate of warm minimalist food sitting near a sunny window. The camera sees the bright window and completely panics. It lowers the brightness to fix the window glare.
Suddenly, your beautiful table looks totally washed out and flat white. The food looks completely unappetizing. You need to take control away from the camera.
#2. The 3 Second Solution to Lock Your Lighting

Open your camera app right now. Look at how you take a picture. Most people just tap the screen quickly to focus. Nearly 90 percent of casual users never hold their finger down on the screen.
A quick tap just resets the lighting every single second. Here is the better way. Point your camera at your main subject. Press and hold your finger directly on the screen where you want to focus.
Keep holding it there for a few seconds. Wait for a yellow box to appear at the top of your screen. It will say, AE AF Lock. This stands for Auto Exposure and Auto Focus. The camera will stop guessing. The brightness stays exactly where you want it.
#3. Fix Blurry Action Photos Instantly
Kids move incredibly fast. The automatic focus gets confused when they run past the camera. It tries to catch them and ends up blurring their face completely. You get a messy smear instead of a memory. You can fix this before they even start running.
Pick the spot where you know they will run. Lock the focus on the floor or a toy in that exact spot using the trick above. The camera is now waiting, focused on that area. Wait for your subject to run into the frame.
Press the button at the exact right moment. It catches fast toddler moments without any motion blur. Using simple iOS 19 camera tricks like this changes how you capture your family.
#4. Shoot Cozy Indoor Spaces

Sometimes you want a room to look cozy and warm. But your phone hates dark shadows. It automatically tries to make dark rooms bright. This makes the picture look grainy and cheap. It destroys the exact mood you wanted to capture.
You can easily fix this common problem. Lock the focus first using the yellow box method. Look right next to that yellow box. You will see a little yellow sun icon. Drag that sun icon down with your finger.
This manually lowers the brightness and keeps the shadows dark. I use this trick constantly when shooting biophilic indoor plants. It also works well inside tiny house living spaces with small windows.
#5. Fast Way to Shoot Blog Pictures

Content creators waste hours fixing bad lighting in editing apps. You shoot twenty pictures, and every single one has different brightness levels. You have to edit each photo separately to make them look the same. The focus lock fixes this annoying problem instantly.
The lock feature keeps the same lighting for multiple pictures in a row. You can shoot twenty different angles of the same object. This is the absolute fastest way to build rapid-fire image prompts. It creates consistent Pinterest pictures for a lifestyle blog in half the time.
You edit the style once instead of twenty times. You get your time back. Knowing how to take professional iPhone photos means letting the camera do the heavy lifting for you.
#6. The “One Tap” Exposure Adjustment Slider

While most users know they can tap the screen to focus and slide the sun icon up or down, few realize there is a dedicated exposure compensation dial hidden just one swipe away.
By swiping up anywhere on the camera viewfinder, a row of icons appears above the shutter button. Tapping the plus/minus (+/-) icon opens a precise horizontal slider.
Unlike the “tap-to-set” method, which resets every time the camera refocuses, this setting stays locked, allowing you to maintain a consistent mood across multiple shots, essential for maintaining a cohesive aesthetic in food or lifestyle galleries.
#7. The Top-Down Level Tool

For those documenting flat-lays, garden harvests, or workspace setups, the built-in leveling tool is a game-changer. This feature is technically “one tap away” once enabled in Settings > Camera > Composition > Grid & Level.
When you hold your phone parallel to the ground for a top-down shot, two crosshairs (white and yellow) appear in the center of the frame.
Overlapping them perfectly ensures your shot is 100% level, eliminating the “leaning” perspective that often ruins professional overhead photography.
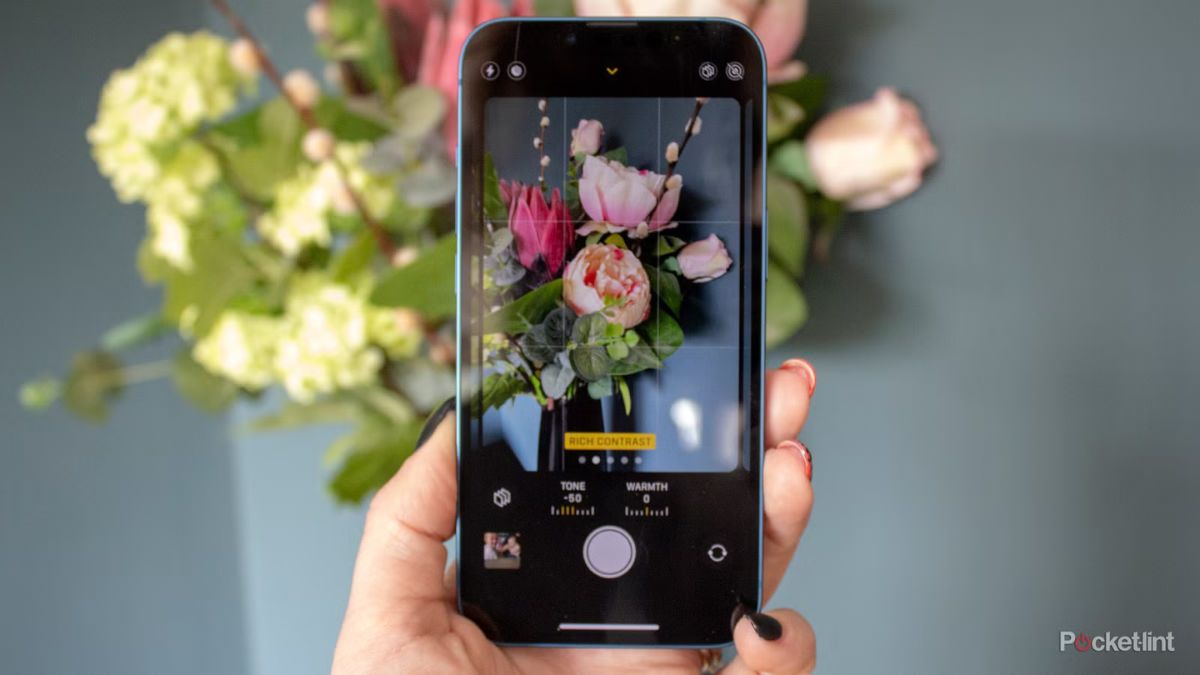
#8. Photographic Styles (The “Internal Editor”)
")
Moving beyond simple filters, Photographic Styles (found by tapping the multi-square icon in the camera menu) allow you to customize how your iPhone’s ISP (Image Signal Processor) handles warmth, tone, and contrast in real-time.
Instead of applying a blanket overlay, this setting preserves natural skin tones while deepening shadows or boosting vibrancy in the background.
For a creator with a specific brand identity, be it moody and desaturated or bright and “Scandi,” setting a custom Style ensures that every photo looks “edited” the moment it’s captured.
#9. Resolution Control and HEIF Max

If you are shooting on a Pro model from the last few years, you likely have a 48MP main sensor, but your phone defaults to 24MP to save space.
By navigating to Settings > Camera > Formats and enabling Resolution Control, a “HEIF MAX” or “RAW MAX” toggle will appear in the top right of your camera app. One tap on this icon switches you to the full 48MP resolution.
This is vital when you need to crop into a photo later, perhaps to highlight a specific texture in a recipe or a detail in a small-space design—without losing the crispness required for high-resolution web use.
#10. The “Preserve Settings” Workflow

The most common annoyance for power users is the camera app resetting to “Photo” mode and “Auto” exposure every time it’s closed. By going to Settings > Camera > Preserve Settings, you can toggle on Camera Mode, Creative Controls, and Exposure Adjustment.
This forces the app to remember exactly where you left off. If you spent time perfecting a specific exposure level for a dimly lit indoor space, it will remain when you lock and unlock your phone, allowing for a seamless and efficient shooting experience.
#11. The Action Mode “Running Man”

Hidden in the top left corner when you switch to Video mode, you’ll see an icon of a person running. This is Action Mode. While the iPhone already has great stabilization, Action Mode uses the full sensor and advanced cropping to deliver “gimbal-like” smoothness.
It is one tap away and essential for lifestyle creators who do “walk-and-talk” videos or follow-along garden tours. It virtually eliminates the jarring camera shake that occurs when walking on uneven ground, though it does require a bit of bright light to work its magic.
#12. Lock White Balance for Video

If you’ve ever filmed a video where the colors shift from “warm” to “cool” as you move your phone, you need to enable Lock White Balance. This is found in Settings > Camera > Record Video.
Once toggled on, your iPhone will stop “guessing” the color temperature mid-shot. For food bloggers and interior creators, this is vital; it ensures that your white linens or neutral-toned walls stay the same color throughout a clip.
#13. The Macro Control Toggle (The Yellow Flower)
")
On Pro models, the iPhone automatically switches to the Ultra Wide lens for extreme close-ups. However, this “auto-switching” can be frustrating when you’re trying to get a specific artistic blur.
By enabling Macro Control in your main Camera Settings, a small yellow flower icon will appear in the bottom corner of your viewfinder whenever you get close to an object.
One tap on that flower lets you manually toggle the macro lens off, giving you back control over which lens is being used, for capturing the delicate texture of a perennial leaf without the camera “jumping” lenses on you.
#14. The Live Photo “Long Exposure” Hack

This is a post-capture “one tap” setting that most people overlook. If you take a Live Photo of moving water (a fountain, a stream, or even traffic), you can open that photo in your Gallery, tap the “Live” dropdown in the top left, and select Long Exposure.
The iPhone will intelligently stack the frames of the Live Photo to create a silky, professional-looking motion blur. It’s the easiest way to get that “pro-photographer” waterfall look without needing a tripod or a heavy ND filter.
